Keep those Hundreds of Substack Subscriptions Organized
Three Easy Steps to De-Stress
Not everyone has (or wants to) download the Substack app and learn how to navigate the many tabs. Sometimes we just want to read what we’re subscribed to and that’s it. Or, maybe the app works great for reading because it works a lot like an ebook app, however, when it comes to organizing the ones you want to reference back to it might be lacking (unless you know all that the app has to offer). So, if you’re like me and rely on your email mostly to see and read the hundreds of Substacks that you’re subscribed to, this is for you.
NOTE: I use Google Mail (Gmail) as my main email where I set everything up and then my iPhone Apple Mail app just mimics whatever I set-up. What I show should be easily copied in any other mail service as the concepts are the same.
STEP 1: SUBSCRIBE/SEARCH
Let’s say you already have subscribed to dozens of newsletters already. If that’s the case, the first thing you’ll want to do is use the Search Box at the top of Gmail to find all of the emails. Either use the name of the newsletter or the email address:
By Clicking on that thing on the upper right it will expand the search features.
When you click “Create filter” it will go through the many thousands of emails you have in your inbox and just show you the ones that are from the same address or newsletter name. I will also open up the Rules window. This window will be your best friend and best way to get to Inbox Zero (more on that in another longer post), but for our purposes, we’ll use this to organize all of our newsletters:
STEP 2: CREATE LABELS
NOTE: Before creating a filter I suggest clicking the PLUS symbol next to the word LABEL in your menu on the left-hand side and creating SUBSTACK. This will allow you to next Substack newsletters you create as filters in the following steps.
Items I suggest always checking off when creating any filter:
Skip the Inbox (Archive it) - This helps to organize it into its own folder (coming next) and out of your main Inbox.
Apply the label: - You most likely will not have created a folder for any newsletters yet, in which case you’ll want to click the drop down “Choose label…” and create a new one. A suggestion for better organization would be to “Nest” your label under the Substack label, like this:
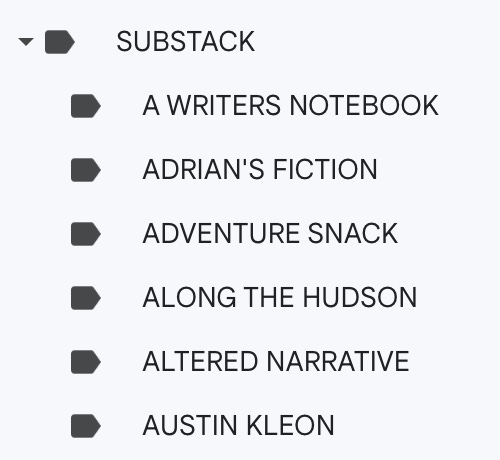
Enter a new label name. I will use the name of the newsletter or the writer’s name. Whatever will help you to know what those emails are more easily. For Substack specifically, I have created a filter for Substack Reads and set the label name to “Substack” so that any Substack newsletters I filter after I “Next label under:” the Substack label I created first. The result will look a little something like this in the left-hand side of Gmail:
Also apply filter to matching conversations. - Most important thing you want to make sure and check when applying the filter for the first time. This will ensure you’re capturing everything from the past that you already have sitting in your inbox.
Currently nested under my Substack label is nearly 50 folders of newsletters. But I never see any of them and this is key when setting this up because it can seem overwhelming to see so many folders. How will you know when one of them gets an email if the filter rule is to immediately put it in a folder and move it out of the inbox.
In my example above I created a Label named MY SUBSTACKS in order to separate out all the publications I’m currently managing. I also have one labeled SUBSTACKS with 50+ ‘stacks nested under that one. But they remain hidden under the “More” area which is how the second half of the organization comes into play.
STEP 3: HIDE IT ALL AWAY
After you’ve created all of your filters, or while you are creating them (up to you when you want to do this step), click the three vertical dots that you will see when hovering over the label name. The window above will pop out. Under “In label list” select “Show if unread” as this will hide the label on the left until there is a new email! This is great if you have dozens or over 100 labels. Make sure you do this for all of them to hide all of your labels from sight. This way your left hand side of Gmail can look a lot like mine does:
Clean as a whistle. I intentionally leave MY SUBSTACKS and SUBSTACK READS as “Show” because I always want to see them even if there is nothing new there. If you have any newsletter or label you always want to see just leave it as its default after setting it up.
How many Susbtacks are you subscribed to? Are you just using the app or have you found yourself overwhelmed with emails in your main inbox?
I hope this process helps you tame them all and hopefully reach Inbox Zero. If you’d like to get more helpful tips on how I did it and you can to, subscribe to this newsletter if you haven’t already because I’ve got many more tips to share on how I reached it in my personal and work emails and strive to maintain it daily.


This is just what I've been needing!