


A series of “How to Use Scrivener” is something I’ve been wanting to do for many years. But there was one aspect of Scrivener I needed to master before I could feel qualified; Compile.
If you’re familiar at all with Scrivener, or even if you aren’t, you may have heard many a writer moan at the mere mention of Compiling a manuscript from Scrivener. I’ve come to know it as a moment in every writer's life where they question their life choices and wish they had used Google Doc or even Microsoft Word instead of Scrivener. Because now they are forced to figure out how to extract their manuscript into a Word or PDF or EPUB/MOBI file. But, once you have set up what you want and how you want it, you can literally set it and forget it.
I will show you how to not only learn how to navigate the Compile part of the Scrivener writing process, but how you can do this one time and use it for every single manuscript you write.
And if you’re wondering why I’m starting to teach the ins and outs of Scrivener with Compile, it’s because it’s by far the most daunting and difficult part to using Scrivener. I strongly believe that if you can master this and feel comfortable exporting your manuscript, the rest will be a cake walk.
Before we begin, I want to suggest watching this 4-part series created by the creators of Scrivener. It’s what I used to “crack the code” and learn how to use Compile. I also looked up some key features mentioned in those videos by reading their manual that you can download here. But fair warning, it’s 900+ pages long!
Let’s begin…
First, open Scrivener. We’ll create a test “Project” but if you already have something you’ve been working on, by all means, use that. For this instance, I’m going to CREATE a NOVEL from the Fiction Projects Templates. Sometimes I’ll create a blank document if I’m working on something that doesn’t need to be exported ever, like a Series Bible. Otherwise, I find it’s handy to start from their Template and just TRASH whatever parts you don’t need as you go.

Once you click CREATE you’ll be taken to the Project Editor Window divided into three sections. I will go into greater detail on what each section means and how they work in tandem with putting together a manuscript, but for the purposes of this tutorial, I’m going to assume you’ve created a document filled with CHAPTERS (ie Folders) and SCENES (ie Sheets) as you see on the far left hand side of the image below. When creating a manuscript you can have multiple Parts that are subdivided into Chapter and Scenes that will be covered at a later time.

Once you have a “completed” manuscript, you’ll want to Compile it into a document that you can take and upload directly to Amazon KDP, your e-reader, or transfer to another program to get it one step closer to publication. I want to suggest if you are a writer of fiction and intend on only using Scrivener, that you make sure to have some of the sections seen on the far left hand column near the bottom: Front Matter & Back Matter -> Paperback/E-book

The unassuming COMPILE can be accessed in two ways. The first is by clicking the icon circled in green below:

The second is by clicking File in the Menu Bar and clicking Compile at the bottom.
Now, try not to be intimidated by all that you see in the Compile pop-up window that appears. Instead, let’s take it one step at a time. First, from the very top of this window drop down the “Compile For:” window to see a list of choices like the image below shows.

As you can see, there are MANY options to choose from. For the purposes of this lesson, I’m focusing mainly on Compiling either a Word Document or a PDF. But you can just as easily select either of the Ebook options once you feel comfortable to do so as they work in just about the same way.
Much like the Editor view is divided into three sections, so is the Compile window. Let’s quickly go over each one just to give you an idea of what they do:
FORMATS: Scrivener gives you a list of pre-made formats under Scrivener Formats but you can create your own format if what you’re looking to Compile isn’t listed there and I will walk you through how, in a minute.
SECTION LAYOUTS: This tells Scrivener how you want each SECTION of your manuscript (Folders & Sheets) to behave when it’s all compiled into whatever format you selected. For instance, if you want a page break after the Chapter or after each Scene (not usual but possible). Or if you want certain sections to be left “AS-IS” meaning they look exactly as they appear in the Editor.
COMPILE: This is the far right (third) column and it allows you to enter metadata (book title, author, etc), select what you want to compile, cover options (for ebook compiling), and other options relevant to your manuscript.
Now that you know what all of those areas do and mean, let’s briefly look at how you can create your own Format. If you’re like me, you want to create an Amazon print book that has dimensions of 5.25 x 8 which is not an option given by Scrivener. One tip here is that you can easily create a duplicate of a Scrivener Format you want to tweak slightly and rename to whatever you want. But for this purpose, we’ll be creating a new format from scratch.
At the bottom of the Formats column, click the + symbol. There will be two options: New Format… or Duplicate & Edit Format…
Select New Format to be presented with the below window. If you want to duplicate and edit an already existing format, simply click the format you want to duplicate, then click the + symbol and select the second option.

Most Important: Before beginning to create your own Format, make sure you save it to the right place! Drop down the Save To options:
Project Formats (default) - Saves your format to that specific Project but it cannot be used on another project.
My Formats (recommended) - Saves your format to use on any Projects created.
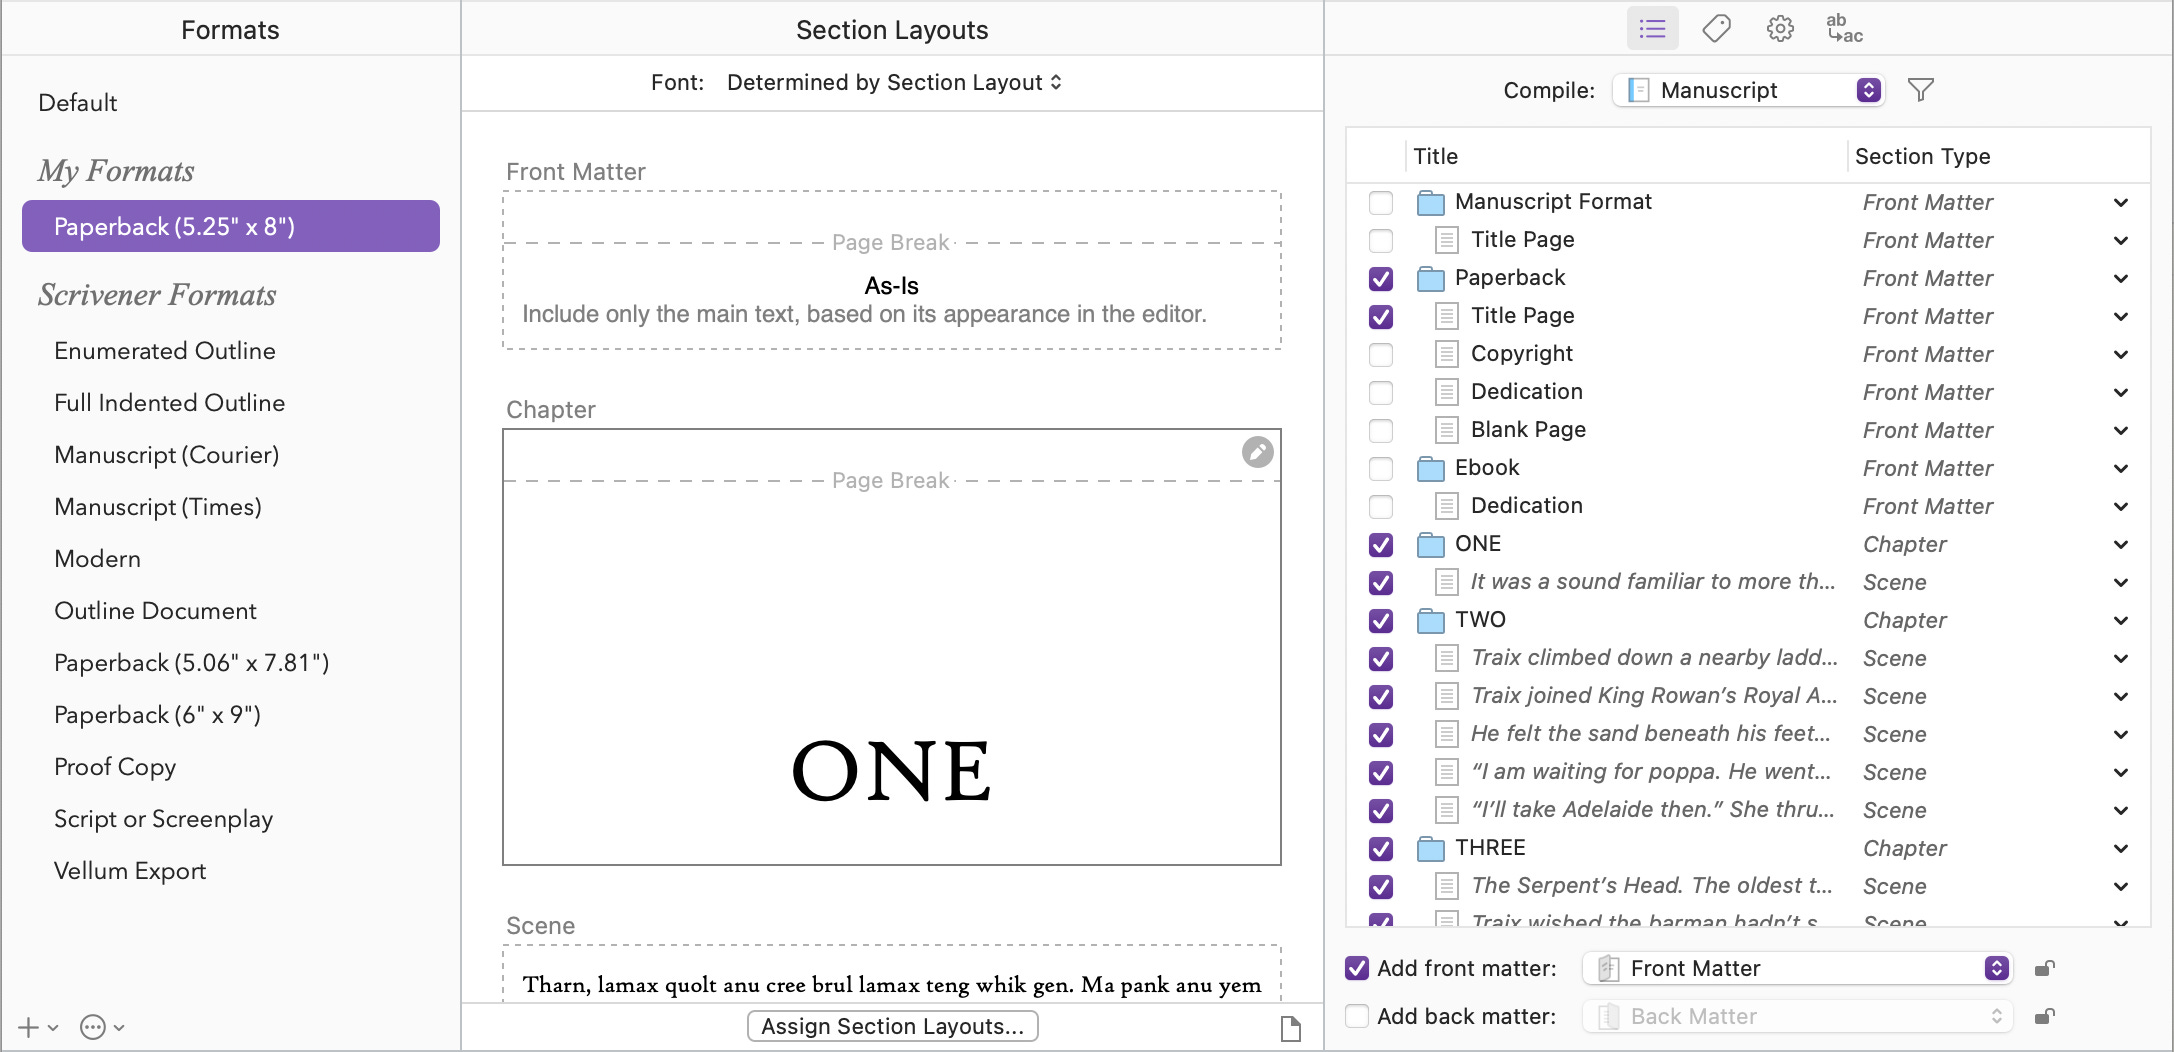
When creating your own format, the most important part is the Section Layouts, especially if you have Parts that break out into Chapters, then Scenes. As you can see from the default options, there are a multitude of Sections to create and manipulate.
Remove the Layout Names you don’t need and assign them as either Title, Metadata, Text, etc. by checking the appropriate boxes. You can also override the formatting of any Section labeled as a Note or Text using the formatting box. I will go over the other options to manipulate in another blog post, but if you are looking to create your own format, it might be helpful to click through them as many of the areas are self-explanatory or you can reference those areas in the Manual as well as from the video guides I mentioned at the beginning of this post that go more in-depth.
Once you have your Section Layouts all decided upon, you’ll want to Assign them. This basically means you’ll want to match up the Sections of your Manuscript with the Section Layouts you created for Compiling. At the bottom of the middle column click the wide button that reads “Assign Section Layouts…” and the below window will open:

If you only created sections that you have in your manuscript and removed the sections you don’t need, then this part will be rather easy as it will be a matter of matching one to the other. Select a Section from the left-hand column and then match how you want that to Layout to look from the right hand column. Do this for all of the Sections then click OK.
Don’t worry, we’re at the home-stretch at this point!
The last column in the Compile window is what you’ll need to decide on just before you hit the Compile button. It’s broken down into 4 icons (or more depending on the Format you choose. For example, ebook will include a Cover option to either include or leave out. This icon will also show up if you have an IMAGE in the Front Matter section of your manuscript). For the purposes of this post I’ll only go over the first two icons, but you might want to look at the others, especially if you are working on a non-fiction book as the Options icon (cog wheel) has things here specific to this kind of compiling).
The Compile Selection icon (first one) simply lists everything you have created under the “MANUSCRIPT” or “DRAFT” folder which is the main folder for any Project created in Scrivener. For this post, I have a series of Chapters that are broken down into Scenes. I also have Front and Back Matter.
Be sure to uncheck any sections you don’t want included in your manuscript. Especially when dealing with Front and Back Matter. You may want some pages but not all of them depending on your use of the manuscript when compiled.
If you have Front and Back Matter, they are assigned to your manuscript at the very bottom. Simply check the box next to each and with the drop down menu, point it to the folder that contains the Sections you want to assign to each. This might include a Title Page, Dedication, Copyright, Table of Contents, About the Author, etc.

The second icon is for entering Metadata of your manuscript. The title, Authors (if there are more than one), and if this is a non-fiction text book, you can include things like Subject, keywords, and comments if needed.

The Options icon will have a couple things pre-checked. It’s helpful to look through and select anything you may want to include or leave out of the manuscript, again, depending on what the content is. For instance, you may have included HYPERLINKS in some areas but don’t want them to show that way when exporting a WORD or PDF document you will later upload for a print book as they may come out looking strange.

Once you’ve looked everything over, you’re finally ready to click the COMPILE button! A window for where you want to save this will pop-up. Make sure you save it where you can easily find it and if you want, there will be an option to open it right away in the appropriate application. For example, if you are creating a PDF, Scrivener can open it in Adobe. If you’re creating a DOCX, Scrivener can open it in Microsoft Word.
This process can be used whether you want to Compile a PDF, DOCX, or Ebook file and like I said, once you set up all the bells and whistles the first time, you won’t have to do it ever again. Just remember to save your format under My Formats!
Till the next step-by-step guide, happy writing!
I’d love to know what you thought of my guide?
Was it helpful? More confusing?
What would you like to learn about Scrivener next?

If you'd like to purchase Scrivener ($49), click the icon & get a 30-day FREE TRIAL.
That's pretty helpful! My problem is that I used a weird numbering system for my chapters (Part 1, Chapter 1.12, like that.) Scrivener can't handle that, at least not easily. It's not formatting chapter titles well, either. They come out in small italics below the giant number. I want an option where the chapter title is big and the chapter number is small.
You have a typo in your article here: Fare warning should be fair warning.