


The very first thing I do immediately after creating another Substack publication is set up my Google Analytics, also known as Google Search Console. Yes, Substack has their own stats that are helpful, up to a point. One of the great things that Google Analytics (GA) provides are keyword searches that people used to find your page, among other things. It’s a simple process that can be done in less than five minutes.
NOTE: If you don’t have any posts, sections, pages created on your newly created Substack you may get an error when you get to STEP 4. If that’s the case, create one or two posts that don’t get emailed to your list (if you imported a list), wait a few hours (or a full day) and then repeat this process. You can still go ahead and do STEPS 1 - 3 in the meantime.
STEP 1: SET-UP A GOOGLE ANALYTICS ACCOUNT
If you have a Gmail account then you already have access to Google Search Console. Just click THIS LINK and click the “Start Now” button to get to your account.
On the left-hand side is this menu. Above “Overview” will be either the website you’ve already connected, in this case it’s pointing to my main Substack.

STEP 2: ADD PROPERTY
Click that dropdown arrow above Overview to see a list of properties (if you’ve done this before with other URLs you own) or if it’s your first time so see the “+ Add Property” option.

You’ll see this window open up.

Enter your full Substack URL in the “URL prefix” window I have highlighted above. Then click the CONTINUE button.

Unfortunately, Substack removed the ability to verify your site via the HTML tag which they had in the early days. The new way requires a bit of an extra step and that’s via the Google Tag Manager. You can click HERE to get to your GTM account. Don’t worry, like Google Analytics, as long as you have a Gmail account you already have a GTM account.
STEP 3: CREATE A TAG MANAGER CONTAINER
Once you are in your Tag Manager account you’ll see the box below. As you can see, I’ve got quite a few set up already. I’m about to add a few more to this list. As you create Substack publications you’ll want to follow steps 2 and 3 to get the code you need.

NOTE: Make sure you have the following three windows open on your web browser:
Google Search Console - Waiting for you to hit the VERIFY button (don’t do it yet)
Google Tag Manager - About to set up your container to get the tag you need.
Substack publication Dashboard - make sure you are at the analytics section.
Click the three dots on the far right to bring up this box and select Create Container:

The Container Settings will pop out from the right side. In the Container name enter your Substack URL. No need to put the “https://” this time. It’s really just to keep them all organized. Then click the “Web” option under Target platform. At the top right the “Create” button will become clickable. Click it.

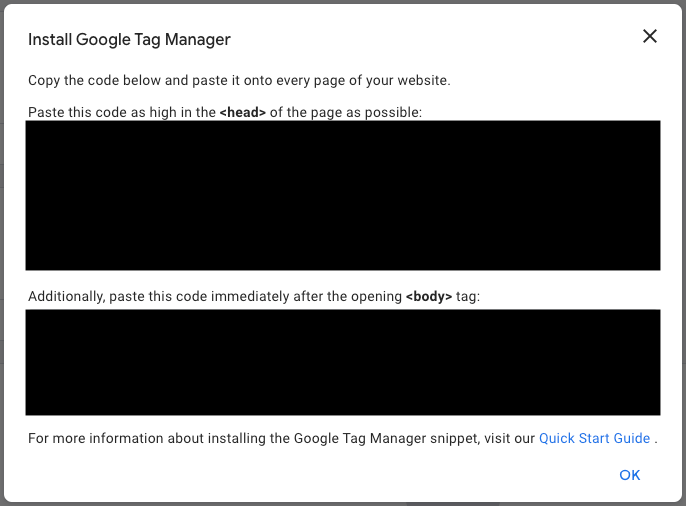
The following box will show up on the screen. You don’t need it and can just click “OK” on the bottom right.
STEP 4: VERIFY YOUR SUBSTACK!
After you click OK and that box goes away, near the top on the right of the page will be the GTM code you need.

Copy that full GTM code. Paste it in the Google Tag Manager ID box over on your Substack Dashboard → Analytics area:
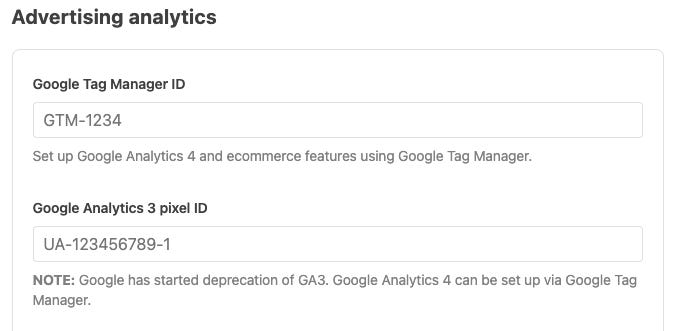
Make sure you click the SAVE button that comes up when you paste that number in.

Now, head over to the Google Search Console window you should still have open. Click the VERIFY button (see the third image in STEP 2). It will turn GREEN when it’s all good and now the wait game happens.
Yep, that’s right, Google needs some time (up to 90 days?) to really start giving you analytics and providing helpful information for you to use in the future. That’s why getting this set-up as early as possible is best.
Okay, that might seem like a lot, but once you’re in the weeds doing it, I promise, it’s really quick. The key is to make sure you’ve got some posts for Google to latch onto when it comes time to VERIFY. If there’s nothing there, then it won’t verify your ownership of the property. YOU’VE BEEN WARNED!
At first, I too was getting 'Ownership verification failed.' This video resolved it successfully: https://www.youtube.com/watch?v=wqJHgOtI5FI
I'm getting the 'Ownership verification failed' every time